Here is a short tutorial how to add a few Windows XP / 2000 / 2003 on the same USB disk.
If using the program for first time, it’s highly recommended to select the auto-format option.
Use FAT32 if you’ll be adding later on Windows 7/8 sources and you’d need to boot in UEFI mode.
If you wouldn’t be needing UEFI boot, NTFS should be your first choice, as XP Setup from FAT32 formatted volume could be quite slow, due to limitations of the FAT32 driver in XP. Here is a quick comparison on FAT16 vs FAT32 vs NTFS.
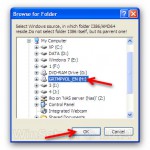
1) If you have your Windows XP or 2003 source as an ISO or similar image, first mount it as a virtual CD/DVD using the free ImDisk for example, or extract its contents to a folder.
A copy of ImDisk is included in WinSetupFromUSB\files\imdisk\. Run install.cmd to install it.
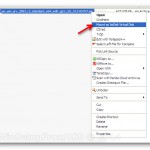

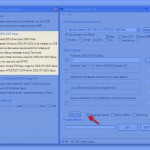
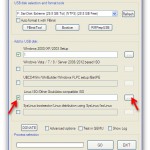
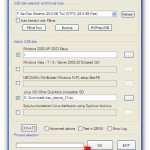
2) Select your USB disk in the drop-down menu and check the auto-format it with FBInst option:
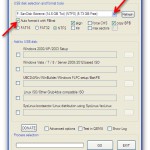
3) Select the Windows XP/2000/2003 Setup option and press the corresponding browse (…) button:
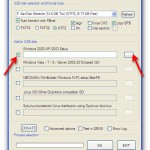
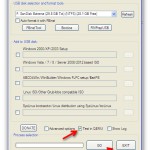
4) If you need to use any of the advanced options, now is the time. They are explained in depth here.
5) Press GO to start the process.
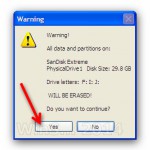
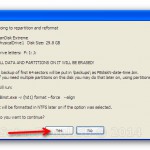
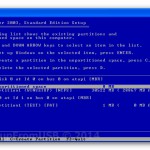
6) If the auto format option was selected, please do read carefully which disk is going to be reformatted, all data is going to be wiped out, the click OK on both dialogue boxes:
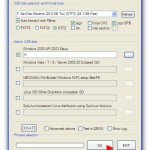
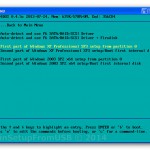
7) You can watch detailed progress of what is happening by selecting the Show Log option:
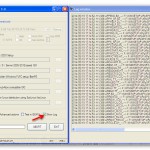
In a few minutes you will see Job Done message, the first source has been transferred:

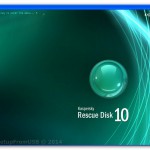
8) Now let’s put another source of this type, that would be Windows 2003 x64 SP2, as well as Kaspersky Rescue Disk ISO image.
Right click on the Windows Server 2003 ISO image and mount it the same way:

9) Use the advanced options if you need to fine tune it
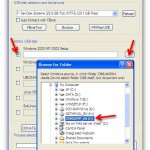
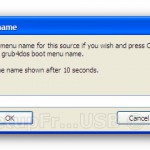
10) Select Linux ISO/Other G4D compatible ISO and browse to the Kaspersky Rescue Disk ISO file:

You can provide custom boot name, the default one will be automatically accepted after 10 seconds:
11) Press GO again and wait until the Job Done message is displayed:
12) That’s it. You should now have a USB disk with XP and 2003 x64 Setup as well as Kaspersky Rescue Disk.
The same way you can add other sources, you only need to remember to add sources of the same type one after another, i.e. select first set of sources, press GO, wait until finished, select second set of sources, press GO and so on.
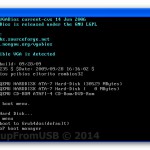
13) You can now quickly test in QEMU virtual machine how this works, use left CTRL + ALT keyboard keys to exit QEMU:


Thanks a lot……….. For your tools……
how do i add/edit a second menu, i.e 121 items on first menu, need to add another 12 items onto a second page/menu
Please read the FAQ and http://www.rmprepusb.com/tutorials/grub4dos
http://diddy.boot-land.net/grub4dos/Grub4dos.htm
http://diddy.boot-land.net/grub4dos/files/menu.htm#submenu
After adding multiple iso in WinsetFromUSB, everything is working fine. I edited the menu list with Bootice, and added a custom gfxmenu menu background. All works fine, but when I add new bootable iso, it won’t add in the menu list file.
The last file i added was windows xp sp3 from cd, is not showing up in the menu list, is there anyway to manually add it in the menu list? Where can i copy the menu list code for windows xp sp3 and add it manually in the menu list?
It seems as whenever i edit the menu list using bootice, then new entries will not show up in menu list.
Or how is the best way to remove windows xp from the usb (since is not that important to me at the moment) without affecting other entries.?
Hi there to all, for the reason that I am genuinely keen of reading this website’s post to be updated on a regular basis. It carries pleasant stuff.
Great information shared.. really enjoyed reading this post thank you author for sharing this post .. appreciated
This is my first time pay a quick visit at here and i am really happy to read everthing at one place
There is definately a lot to find out about this subject. I like all the points you made
Attractive section of content I just stumbled upon your blog and in accession capital to assert that I get actually enjoyed account your blog posts Anyway I will be subscribing to your augment and even I achievement you access consistently fast
I liked it as much as you did. Even though the picture and writing are good, you’re looking forward to what comes next. If you defend this walk, it will be pretty much the same every time.
Hello Neat post Theres an issue together with your site in internet explorer would check this IE still is the marketplace chief and a large element of other folks will leave out your magnificent writing due to this problem