Here is how to quickly add multiple Windows NT6/10 (Vista, 7, 8, 10, Server 2008/2012 etc.) sources and Ubuntu with persistence space to a USB disk.
1) If using the program for first time on this USB disk, select the auto-format option. Use FAT32 if you’d need to boot in UEFI mode.

2) Select the first NT6 source, it is expected as in ISO image file, here is an example with Windows 7 x64:


3) (Optional) In advanced options you could change folder and boot menu name, make Q-Dir File Explorer launch before start of Setup and add a folder with custom boot critical drivers to be loaded. The latter could be useful to load custom USB 3.0 drivers or SATA/AHCI/RAID ones.
For non-boot critical drivers, such as Wireless/WLan, LAN, Video or Sound drivers, a good idea is to use SAD (Stand Alone Driverpack utility), a proven and reliable solution from the DriverPacks team. More details about these options can be found in the FAQs.

4) (Optional) Add Ubuntu 14.04 Desktop with its own persistence space:


5) Press GO to start the process:

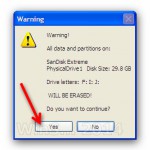
6) If the auto format option was selected, please do read carefully which disk is going to be reformatted, all data is going to be wiped out, the click OK on both dialogue boxes:


7) You can watch detailed progress of what is happening by selecting the Show Log option:

In a few minutes you will see Job Done message, the first two source have been transferred:

8) Now lets add another NT6 source, it would be Windows 8 Enterprise Eval x64, in the very same way as the first one. To preserve contents of the USB disk, make sure the auto-format option is not checked. Press GO and wait until process completes.:


9) Lets add yet another NT6 source, this time Server 2008 R2 x64, sequence is exactly as before:


10) Here is the boot menu once the system was booted from this USB disk:


11) To get persistence in Ubuntu, when the Live CD menu gets displayed hit the key to enter “Other Options”. This will display the arguments that the Live CD passes to the kernel. At the end of this argument list just add a space and add the word “persistent”. This will instruct the Live CD to maintain and use persistence.


When trying to add 2nd Win7/8/10 ISO after auto formatting with the first one. I get Warning USB fromatted by Windows as superfloppy. Unable to proceed without reformatting.
Please read the last comments on the download page
hi i make a usb disk with windows 7&10 [86x , 64x ]
i followed the instructions
but when i try to boot for it i got this error
error 22: no such partition
while if i boot in uefi it start and show me the 4 type of windows and work normaly
How did you format it initially?
Fat32
i think NTFS
not successful. there’s an error. “COULD NOT UPDATE BOOT.WIM WITH THE NEW WINPESSHL.INI FILE! MAKE SURE NO OTHER PROGRAM IS INTERFERING WITH THE PROCESS AND PROGRAM HAS THE APPROPRIATE PERMISSIONS TO READ AND WRITE TO ITS FOLDER AND TRY AGAIN”. and also this “COULD NOT PREPARE NT6 BOOT FILES!”
please help. thankyou!
Cannot help without the log files. Details hiw to provide them are in the FAQ page.
i’m facing the same problem dude,
here is the last log line:
==
2016/10/22 11:51:09- Updating BCD store in J:\boot\bcd
2016/10/22 11:51:09- Path to bcdedit.exe: C:\Windows\system32
2016/10/22 11:51:09- Checking for multiple osdevice entries
2016/10/22 11:51:09- The boot configuration data store could not be opened.
Access is denied.
2016/10/22 11:51:09- Creating new entry
2016/10/22 11:51:09- The boot configuration data store could not be opened.
Access is denied.
2016/10/22 11:51:09- Func UpdateBCD returned an error: 22
2016/10/22 11:51:09- Func MakeVistaBoot returned an error: 5
2016/10/22 11:51:19- Removing TEMP folder
2016/10/22 11:51:19- ———————————Program quited———————————————–
==
please help.
thx
Something is preventing access to j:\boot\bcd, you need to figure out what and why, I cannot help really.
And that’s different issue than the one above, although looks similar.
Install unlocker, check for any locks on thus file while it’s being read by the program.
Hi I’m not successful doing this.I have got image files but those are in Zipped condition…I made that twice but while booting even the yellow list comes with multiple iso selecting one but then nothing happens..And while extracting those iso files that make a lot of folders and, Don’t know which one to select through winsetup program while doing this….What can be the problem, zipped file doesn’t work?
Zipped files do not work of course!
Define “images” please, that could be anything.
There are several tutorials and faq which you need to read to figure out which option to use.
Hello there. I have Windows 7 32 and 64 editions of Windows 7 you want to place at the same time but I get an error
Please look around this site, it’s mentioned on several places, like supported sources page, that this is not supported.
Good afternoon. I want to make a pendrive 32gb with these operating systems:
Windows 7 Professional SP1 x64
Windows 7 Ultimate SP1 x86
Windows 7 Ultimate SP1 x64
Windows 8.1 x86
Windows 8.1 x64
Windows 10 x86
Windows 10 x64
Windows XP x86
Ubuntu 10.16 x64
Which version should I download?
And how to make the x86 and x64? I must open the WinSetupFromUSB to enter the x86 versions and then open the x64 to add the rest?
Thank you.
Use latest version, x32 or 64 only depends what Windows you are running, nothing to do with what source you are adding.
Hi
i want to add windows 10 but i have a error
Line 34284 (File “D:\ ….. “):
Error : Error in expression
Help me Plz
Provide log files please
I’ve the same Error Lin 34284 – I’m able to put one Windows 10 Source in the USB-Stick, but after that all other sources (Win10 or Win7) will give the same Error.
How to provide my log to you?
Details in the FAQ
Hello!
I uploaded the log file:
https://www.datafilehost.com/d/07627b5d
Can you tell me what’s the cause of the problem?
Can you try exiting the program before adding second source?
Does it break if you add the same source which is already on the USB disk?
Both, exiting the program before adding second source and adding the same source again cause the error (Line 34284)
I need to review again logs and compare with source code where exactly it’s breaking. Give me a couple of days. Is there any link I can download the same ISO?
Can you try to extract WinSetupFromUSB to another folder, say c:\winsetup\, try again and upload new set of log files?
Hi, trying to build multi-boot USB with Windows install sources and a persistent Linux Mint 18 64-bit (Ubuntu variant). I created a persistence file as instructed (2 GB). Once I select the Linux Mint entry in the boot menu, I hit escape at the boot options to enter my own options, and type “persistent” (no quotes) before the — (I put a space afterwards as is standard). It does not actually seem to be keeping persistence, however. It boots normally, whether I also add “toram” or not (though “toram” succeeds in loading entirely into ram). But the casper-rw partition that’s “tacked” or “ghosted” onto the end of the usb device (/dev/sdb3) never mounts, and any changes I make (text files scattered about in various locations) don’t keep between reboots.
/dev/sdb4 does mount as /cdrom when booted normally, when booted “toram” does not mount at all, which is expected.
What am I missing? WSFUSB 1.8
Have you checked if Mint 18 supports persistence using casper-rw partition? Had a quick google search and it seems after 17.2 something got broken. Might also try lowercase casper-rw as partition name. Check the last post here, no idea if that’s fixed or not:
https://forums.linuxmint.com/viewtopic.php?f=42&t=229086
It seems the last post mentions that persistent partitions stopped working. Other thread:
https://forums.linuxmint.com/viewtopic.php?t=227470
Post #3 mentions that Ubuntu mangled casper such that it won’t recognize a casper-rw on the SAME DEVICE AS ONE IS BOOTING TO (emphasis mine).
Since partition #4 is used to create the booting file system, partition #3 being casper-rw is being ignored.
However, the idea of lower-casing the partition name sounded promising – in post #7 on that thread they say that using Multisystem they can get persistence to work with a casper-rw partition… I’ve rebuilt my linux mint with a 300 mb persistence file with lowercase partition name, but still no luck.
Apparently the newest Ubuntu, however, has the same problem – I tested it the other night with a friend’s stick and he had the same problem – no persistence with ubuntu 16.x using WSFUSB.
I suspect this thread:
https://askubuntu.com/questions/664577/unable-to-boot-ubuntu-live-usb-flash-drive-with-casper-rw-persistent-partition/878009#878009
May have the answer – in that it requires editing the files in an installed live USB – however, we’re not really doing LIVE USBs now are we? We’re doing emulated Live CDs off of USB. And we can’t assume editing the files pretty much.
There’s a Linux tool called Multisystem which seems to be, according to most forum threads, able to get around this, and I don’t know how they’re doing it but it might be worth a shot looking at that? Maybe it will help improve the process for WSFUSB.
So, I think I’ve been made a liar of. Tricksy computers. 🙂
Turns out that when I had casper-rw (all-lower-case) in my label, I WAS getting persistence! Linux just never mounted the disk directly – but when I checked the /cow directory it persisted. Tested with some changed files in /etc and /home — they work. I’m not sure if it’s because of the capital letters in the label or not, but it seems to have worked when I set the label SPECIFICALLY to “casper-rw” all lower-case.
It didn’t show it as a persistent drive, but /cow (the cow-file system that is used by ubuntu to make persistent live files) showed the right size, and changes were being written to the partition when I re-mounted it.
Right now I’m testing a theory from “http://www.winsetupfromusb.com/supported-sources/comment-page-12/#comment-2384” and I might be interested in writing you up a tutorial on how to have UEFI:NTFS (from Rufus) combined with WSFUSB.
Right now testing with an 8 GB persistence file (wowzers) with UEFI:NTFS built usb using winsetupfromusb to put linux on there. If successful, I’d like to give you the steps I took for it, as well as to suggest that the default persistence label be changed to “casper-rw”.
Thanks!!
Another annoying comment of mine (sorry, I swear I keep thinking of these things)
What method do you use to create the persistence file, do you have a particular link or place online that details the steps you do that might be duplicated? I ask because my 8 GB file screwed up but I think the label was bad, but it would be nice to create a few persistence files for testing (and making a few manual menu entries) off the same ISO, without having to copy the ISO over and over and over again.
You know, for testing purposes. 🙂
Take a look here:
http://reboot.pro/topic/9916-grub4dos-isohybrided/page-2#entry88531
I have made multiboot using this fantastic tool ( WIndows 10 pro x64 – build 1709 + Windows 7pro x64 + Windows 7 pro x86 + Ubuntu 17.4 + some tools ). Now I have to replace build 1703 with 1709. How to do that to avoid formatting usb flash and starting all over for the begining, please ?
Thank you
Could replace just the ISO file in tje corresponding directory in /WINSETUP/…
Alternatively, delete the whole subdir and remive the boot entries for both BIOS and UEFI bcdstore, details in the FAQ.
Thank you, sir.
Working..